With PayPal, it’s quick and easy to send professional invoices. Kommo can help you to automate this process and keep all the information about your payments right inside the lead card.
If you want to learn how to connect your PayPal account with Kommo, you can visit our PayPal - How to connect article.
In this article, you will learn about:
How to create invoices in the Lead card
When you have successfully installed the PayPal integration, a new PayPal section will be created in the left side tab of the Lead card. There, you can find all your invoices for the current Lead or create a new one by clicking the ‘Create invoice’ button.
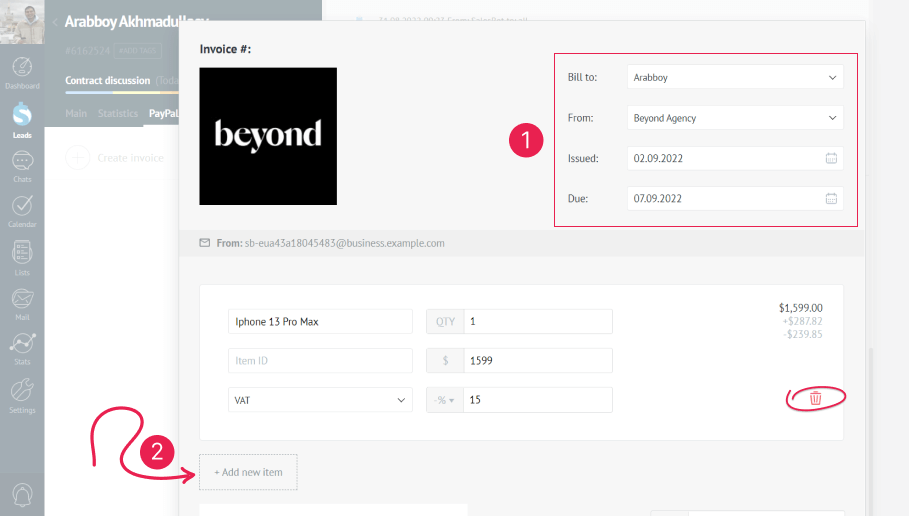
Once ‘Create invoice’ is clicked, you have to enter the details of your invoice. First, choose the desired contact of the Lead and then a business entry from the drop down list, and select the issue date of the invoice. You can also set a due date if you want a clear deadline for the payment.
Next, you have to enter the items that your client is buying. Just fill in all the details and apply taxes or discounts if necessary. When you send an invoice, the item will be automatically added to your PayPal items list and next time you want to create an invoice, you will be able to choose it from the dropdown menu.
To add several items, go with the ‘Add new item’ button. Use the trash icon to delete them.
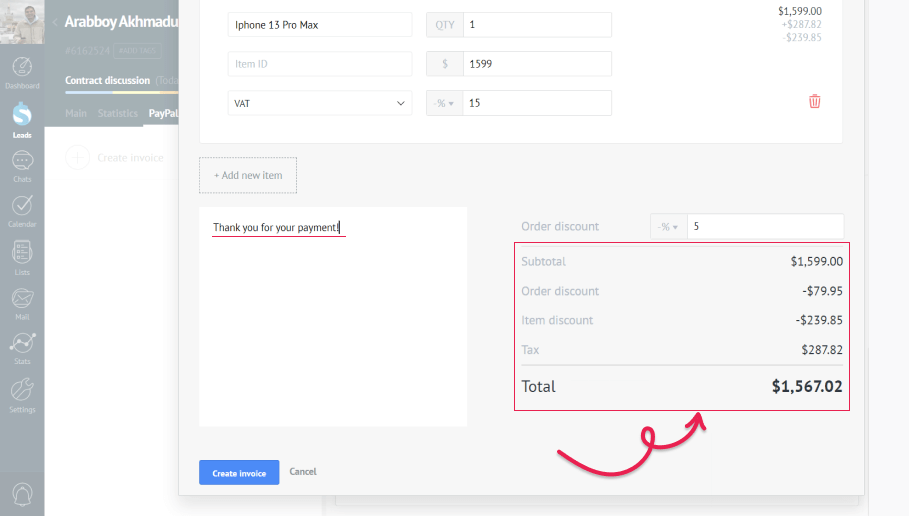
Finally, you can add a note to your invoice in the left side text area. On the right side, you can give a discount to the whole order and review the invoice details.
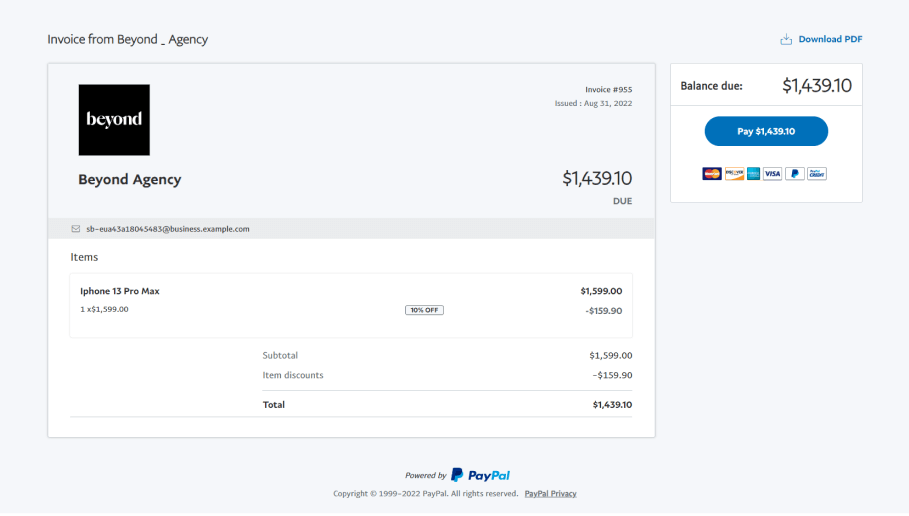
Once everything is set, click ‘Create invoice’. The link to the invoice will be saved in the correspondence history and in the PayPal section on the left hand side in the Lead card. By clicking on the link, you can see what your invoice looks like.
How to create automatic invoices with Salesbot
With Salesbot, you can automate the process of sending invoices. To do this, you need to create a bot with a PayPal widget step.
Note: In Salesbot you can create invoices based on the Sale value of the Lead or the products attached to the Lead. If both of them are empty, then the invoice will not be created.
If you want to learn more about Salesbot, visit our Salebot articles.
To create a Salesbot with a PayPal invoice step:
-
Head over to the Settings > Communications tools > Salesbot and choose to create a new Salesbot.
- In the next window of premade bots, scroll down to the bottom and select the ‘Start from scratch’ option.
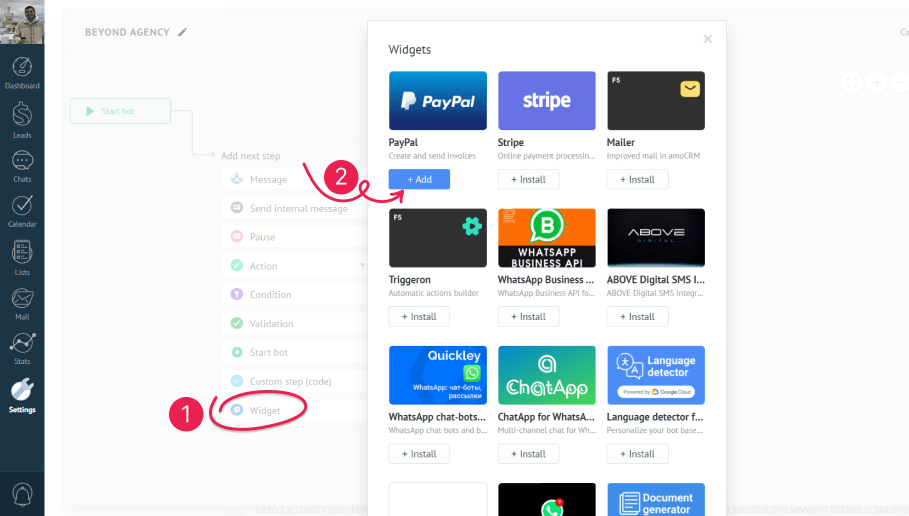
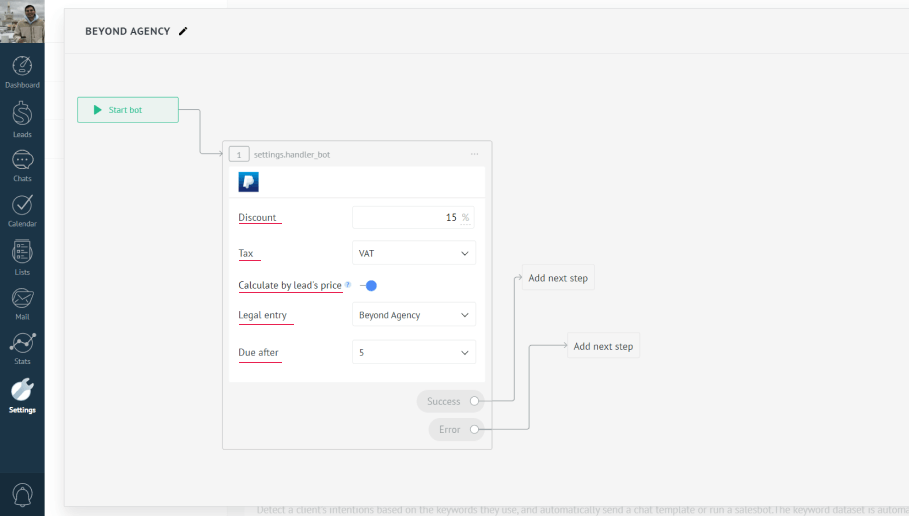
- Next, you’ll arrive in the Visual editor window where you can see a number of steps. Click ‘Widgets’ and choose to add PayPal.
- In the PayPal window, you can give a discount, choose a tax template, change your legal entry and/or set a due date for more strict payment deadlines.
By turning the toggle on, you can choose to calculate the invoice by the Lead's sale value. Otherwise, the calculation will be carried out according to the elements attached to the Lead card.
- Here you can see the success and error payment scenarios.
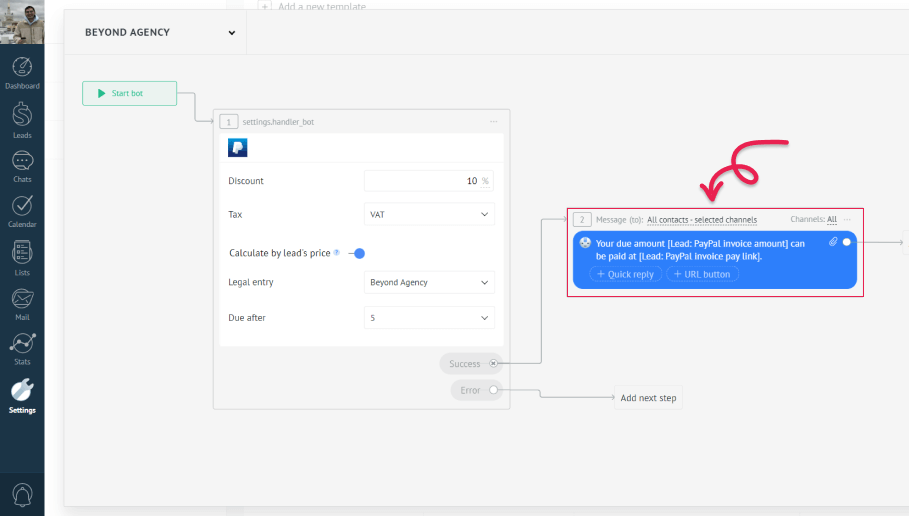
a. For the success scenario, add a message step and use the proper placeholders to send the link and the amount of the invoice to the client. For example, you can write ‘Hello! Your due amount [PayPal invoice amount] can be paid at [PayPal invoice link]’. Placeholders can be created by putting a bracket ‘[‘ inside the text. They automatically pull out the necessary data and help you make your invoices more personal.
If you do not add this step, an invoice will be created and saved in the Lead card but the link won’t be sent to the client. So make sure to include this step with the link of the invoice.
b. For the error scenario, you can add a note by choosing Add next step > Action > Add note and write, for example, ‘The payment has been unsuccessful’. This note will be displayed inside the Lead card and warn you about the status of the payment, so you can take necessary actions.
- Lastly, add the ‘Stop bot’ step for both scenarios and save the bot.
- On the next window, configure when and in what cases your salesbot should trigger.
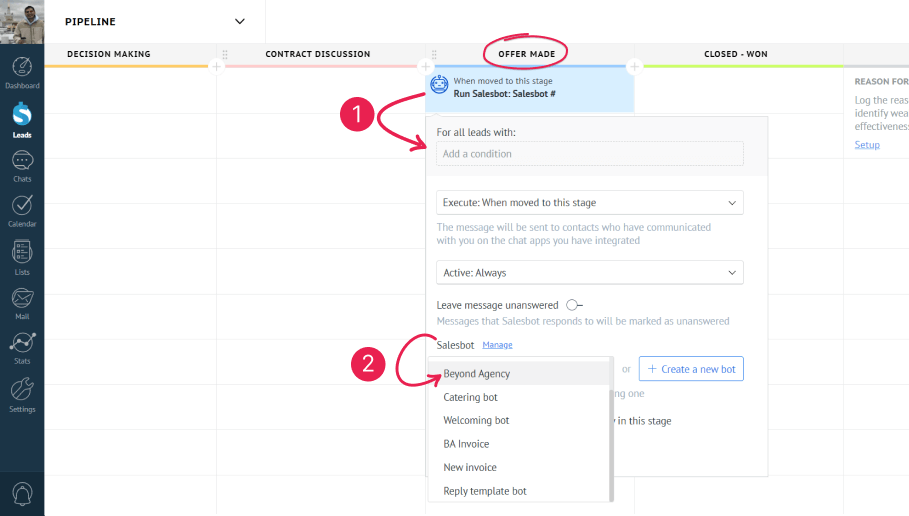
Let’s say that I want my clients to get automatic invoices when they are moved to the ‘Offer made’ stage of my pipeline. For that, I head over to Leads > Setup and click the plus icon under the stage that I want to place the bot on. On the next window, add the Salesbot trigger, select the relevant bot and click ok. Now when the lead is moved to this stage, the client will get an automatic invoice.
Creating automatic invoices in Digital Pipeline
You can also create automatic invoices from the Digital Pipeline. It can be a little tricky, but when you do that, it can save you a lot of time and energy. Besides, it allows you to move your leads to a different stage automatically when the payment is completed.
For this, you need to install a PayPal widget in the Digital Pipeline and then create a small bot to send the link to the user.
-
Head over to Leads > Setup and click the plus icon under the stage that you want to apply the trigger on.
- Next, scroll down to the PayPal widget and click ‘Add’.
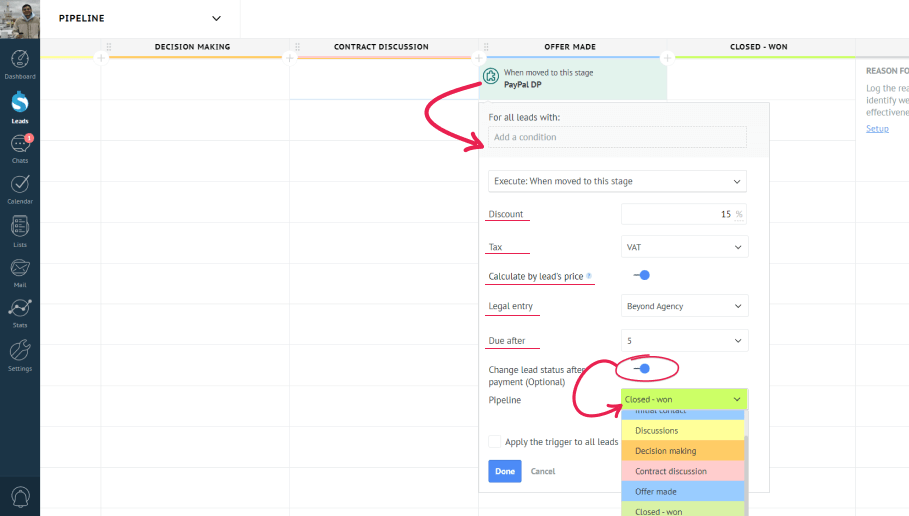
- On the widget window, choose the legal entry, set the due date, and apply taxes and discounts if necessary.
The invoice is calculated based on the prices of the products attached to the Lead. If you want it to be calculated according to the Lead’s sale price, then turn the toggle in the middle on.
You can also choose to send the Lead to another Lead stage when the payment is completed. For that, switch the toggle at the bottom on and choose the pipeline that the Lead should be moved to after the payment.
- When everything is configured, hit ‘Done’
The tricky part is that this widget can only create the invoice but cannot send it to the user. That’s why you also need to create a small bot that will send the payment link.
-
To create a bot, head over to Settings > Communication tools > Salesbot and choose to create a new bot.
- On the next window, scroll down to the bottom and choose ‘Start from scratch’.
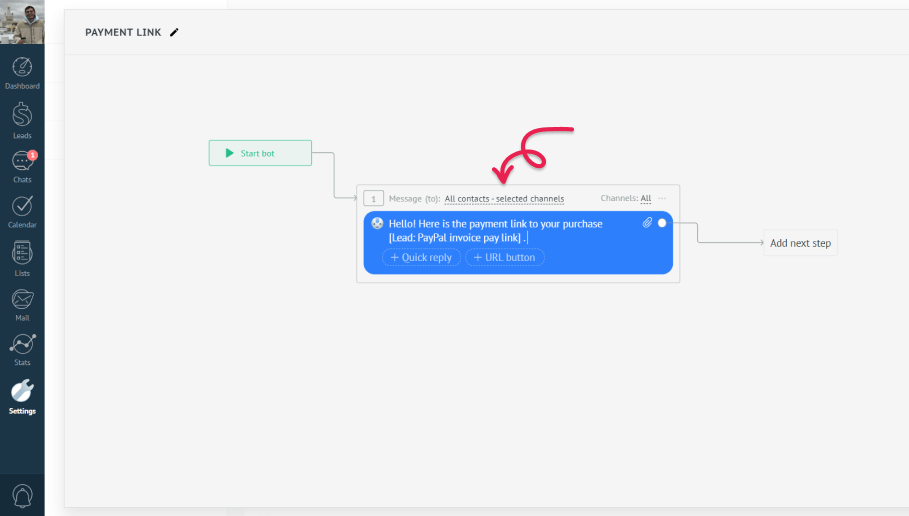
- Next, choose the ‘Message’ step and enter your text with the placeholder to the link of the payment. For example, you can write ‘Hello! Here is the payment link to your purchase [PayPal invoice link]’.
- Then, add the ‘Stop bot’ step and hit ‘Save’ in the upper right corner.
- You don’t have to add a trigger at this moment, so just click cancel when the setup triggers window pops up.
-
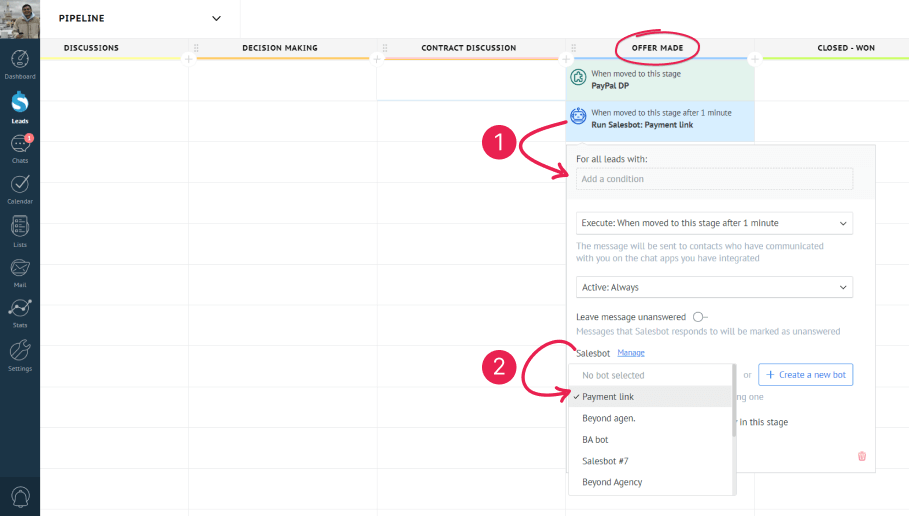
Head back to the Digital pipeline through Leads > Setup and under your PayPal widget trigger box, add salesbot trigger by clicking the plus icon and choosing the Salesbot.
- For the Salesbot field, choose the bot that you have just created
- Finally, click the Execute field, go to ‘When moved to this stage trigger’, click ‘Immediately’ and choose ‘after 5 minutes’ for the time period. You can put any time interval you want for this part. This sends the link to the user after this amount of time.
- Now click done, save the changes.You can now leave the Digital pipeline.
- Now, when you move the Lead to this stage, an automatic invoice will be created and the status of the Lead will be changed automatically when the payment is completed.
Editing Invoices
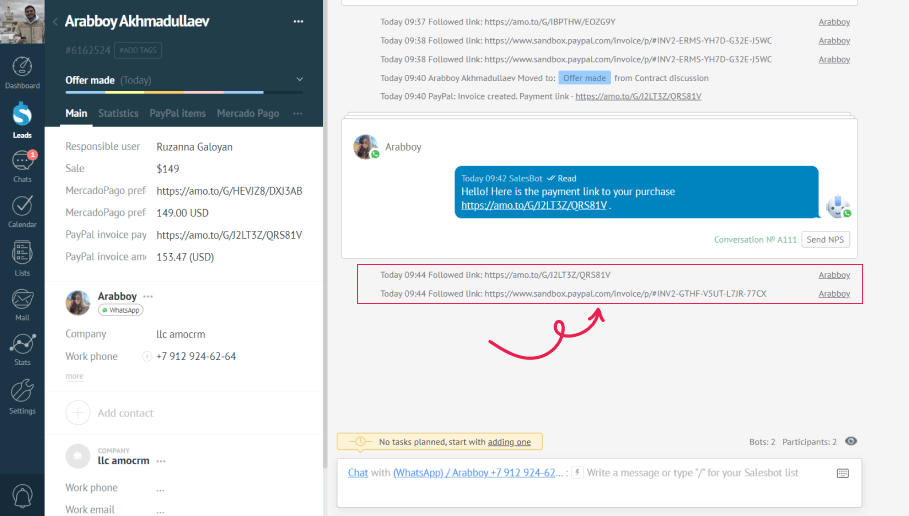
Whether you send an automatic or manual invoice, all the information, including the link of the invoice will be saved in the correspondence history. When someone follows the link, you can find the record there.
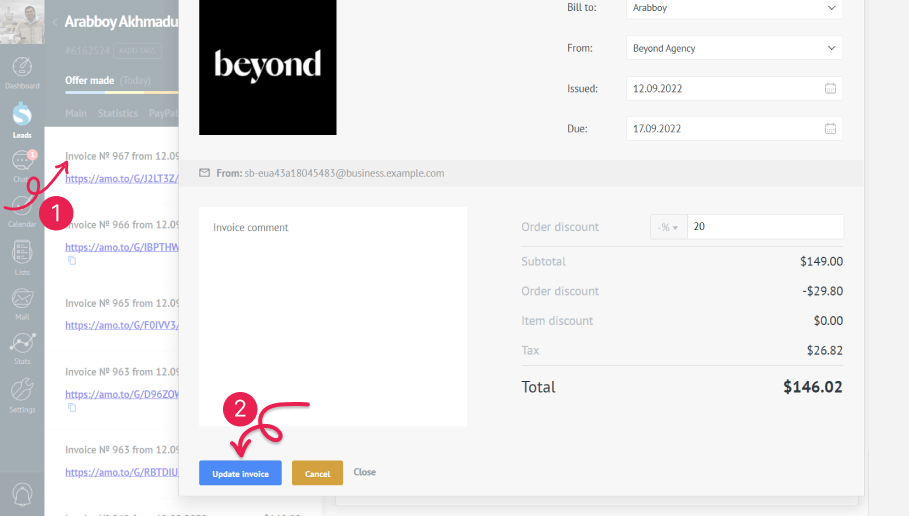
You can also update the invoice if you want to make some changes to it. For that, just click on the name of the invoice in the PayPal tab of the Lead card and make all the necessary changes. Once done, hit ‘Update’ at the bottom of the page
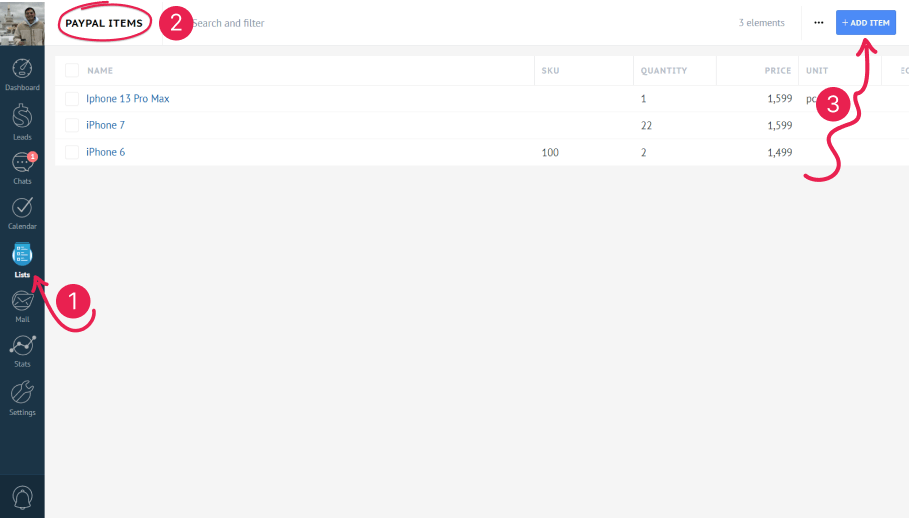
PayPal items
When you install the PayPal integration, a new Paypal items list will be created in the Lists section. There, you can add all your products and use them when creating an invoice. Moreover, when you add a new item while creating an invoice that was not added before, it will also be displayed here.
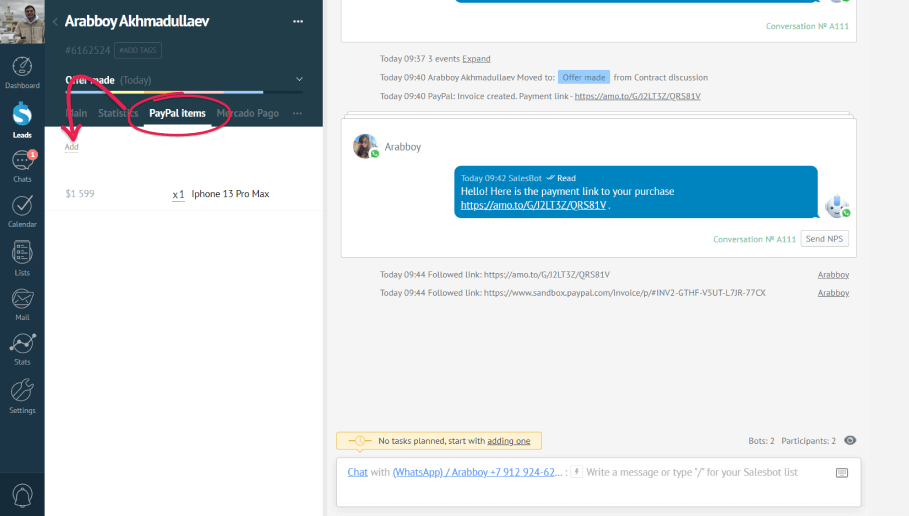
If you want to attach an item to a particular Lead, just go to the Lead card, switch to the PayPal items on the left hand side tab and click ‘Add’. Next, you can choose an item from your PayPal items list.
Additionally, new items that you have added while creating an invoice will also be attached to the corresponding lead. You can use the x button to detach it from the lead.
Need more help in setting up or troubleshooting? Contact us by sending an email to support@kommo.com or write to us on Facebook.
Not a user yet? Visit our tour page or contact us for a demo.